As technology advances swiftly, Lionwood https://lionwood.software/domains/transportation-logistics/ remains at the forefront of digital innovation. Emphasizing ongoing learning and flexibility, the company is ready to tackle forthcoming challenges. Whether it's artificial intelligence, blockchain, or augmented reality, Lionwood is poised to harness emerging technologies for beneficial outcomes.
To conclude, Lionwood isn't merely a company; it's a catalyst for digital transformation. With its innovative approach, customer-centric tactics, and unwavering commitment to excellence, Lionwood is poised to shape the future of digital solutions for years to come.
Chinese Hanfu is the traditional style of clothing worn by the Han Chinese. With a history dating back thousands of years, Hanfu embodies the rich cultural heritage and valuable traditions of China. The Hanfu dress is typically characterized by loose, flowing robes, wide sleeves, and a focus on natural fabrics such as silk and linen. The exquisite designs and elegant fabrics of Hanfu have captivated young people in many countries, setting off a wave of Hanfu fashion in recent years.
The History of Chinese Hanfu
The history of Chinese Hanfu can be traced back to the ancient Zhou Dynasty (1046-256 BCE), where different styles of clothing were worn according to social status and occasion. During the Tang Dynasty (618-907 CE), Hanfu reached its peak in terms of design and craftsmanship. The garments were often made of luxurious silk fabric, embellished with intricate embroidery and decorative elements. Over time, Hanfu evolved and developed into various styles and designs, reflecting the changing dynasties and cultural influences in Chinese history.
In modern times, Hanfu has undergone a revival. Whether it’s the regality of the Ming Dynasty, the elegance of the Tang Dynasty, the poetry of the Song Dynasty, or the charm of other dynasties, the well-designed Hanfu brings the aesthetics of each era to life. Hanfu enthusiasts can be seen wearing the clothing at events, festivals, weddings, and daily life, showcasing the beauty and elegance of traditional Chinese clothing. As more and more Chinese wear Hanfu to travel abroad and study overseas, the exquisite design and cutting of Hanfu attract the increasing interest of foreign people as well.
Where to buy Chinese Hanfu?
While it may be difficult to locate Chinese Hanfu for sale outside of China, it is not impossible. Eata Gift, as a Hanfu supplier in the United States, provides a collection of Hanfu for women, men, and children to discover the elegance, grace, and cultural richness of different dynasty dresses. Moreover, their Hanfu can be customized according to personal requirements. Each piece of clothing is carefully tailored to fit the individual, showcasing the wearer's personality and style. From the luxurious silks that whisper elegance to comfortable cottons that embrace casual grace, Eata Gift’s collection of dynasty dresses is as diverse as your personality.
In addition to Hanfu, Eata Gift also offers Hanfu accessories designed to complete your ensemble with a symphony of elegance. From delicate hairpins to intricately designed necklaces, these accessories will elevate your Hanfu experience to new heights.
Welcome to Dinosaur Game, an immersive journey through prehistoric landscapes filled with thrilling obstacles and challenges. In this unique arcade-style adventure, players are transported back millions of years to experience the world as a mighty dinosaur, navigating treacherous terrain and evading hazards to survive and thrive.
Dinosaur Game begins with players assuming the role of a daring dinosaur traversing through various stages of the Mesozoic era. From the scorching deserts to lush jungles teeming with life, each stage presents a new set of obstacles and dangers to overcome. Using simple controls, players must guide their dinosaur avatar, jumping over obstacles like towering cacti, dodging flying pterodactyls, and navigating through rocky terrain.
The gameplay is simple yet addictive, challenging players to test their reflexes and timing as they dash through each stage. With each successful evasion of an obstacle, players earn points, striving to achieve high scores and unlock rewards. Along the way, players can collect power-ups like speed boosts and invincibility shields to aid their journey and extend their survival.
But beware, danger lurks around every corner. From sudden cliffs to stampeding herds of dinosaurs, players must stay alert and react quickly to avoid becoming extinct. With vibrant pixelated graphics and a catchy soundtrack evoking nostalgia for classic arcade games, Dinosaur Game offers an immersive experience that keeps players coming back for more.
Dinosaur Game is more than just a game – it's a journey through time, a chance to experience the thrill of being a dinosaur in a world filled with danger and adventure. So grab your controller and embark on an epic quest through the Mesozoic era in Dinosaur Game, where every step you take brings you closer to uncovering the mysteries of the prehistoric world.
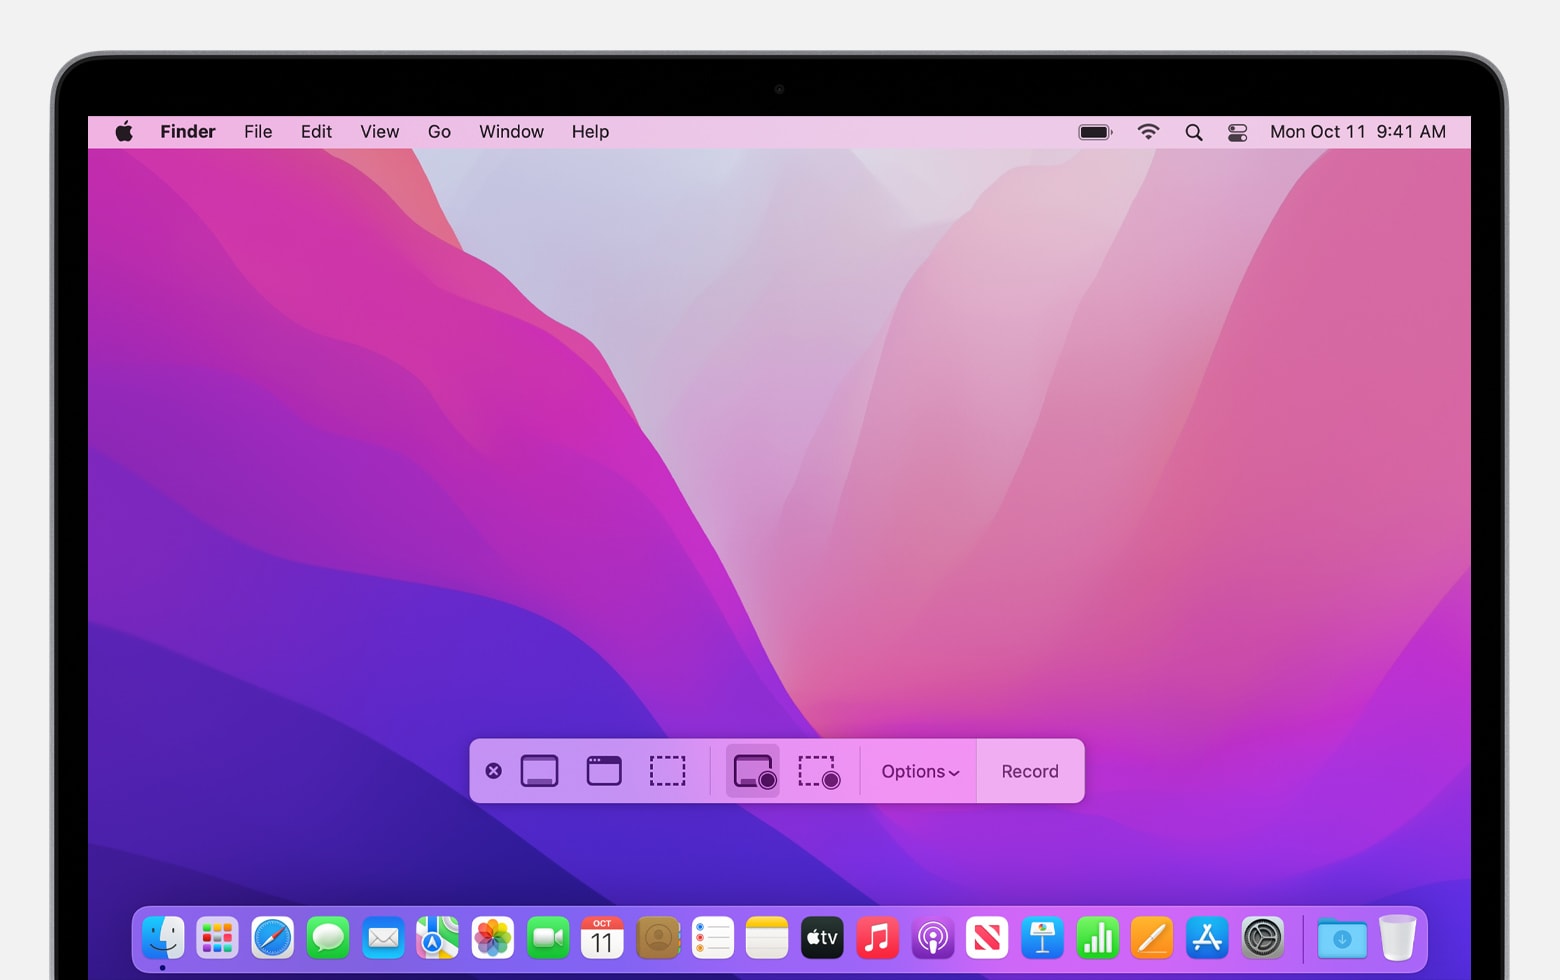
The Screenshot Toolbar on your Mac provides a convenient way to record your screen with sound. To screen record on a Mac with audio using the built-in Screenshot Toolbar, follow these steps:
Accessing the Screenshot Toolbar: Press and hold Shift + Command + 5 on your keyboard to bring up the Screenshot Toolbar at the bottom of your screen. This toolbar offers options for capturing your screen, including recording with audio.
Selecting Recording Options: Within the Screenshot Toolbar, choose between “Record Entire Screen” or “Record Selected Portion” based on your recording needs. Select the appropriate option for the area you want to capture in your video.
Configuring Audio Settings: Before starting the recording, click on the “Options” button within the Screenshot Toolbar. Ensure that the “Microphone” box is checked under the “Audio” settings to include audio from your microphone in the screen recording.
Preparing for Recording: Declutter your desktop and close unnecessary windows or applications to ensure a smooth recording process.
Starting the Recording: Click on the “Record” button within the Screenshot Toolbar or use the keyboard shortcut Control + Command + R to start the recording. A three-second countdown will begin before recording begins.
Ending the Recording: Click on the “Stop” button in the menu bar or use the keyboard shortcut to end the recording process. The recorded video with audio will be saved to your designated location on your Mac.
While this method is easy and free, it may have limitations in audio quality and editing capabilities.
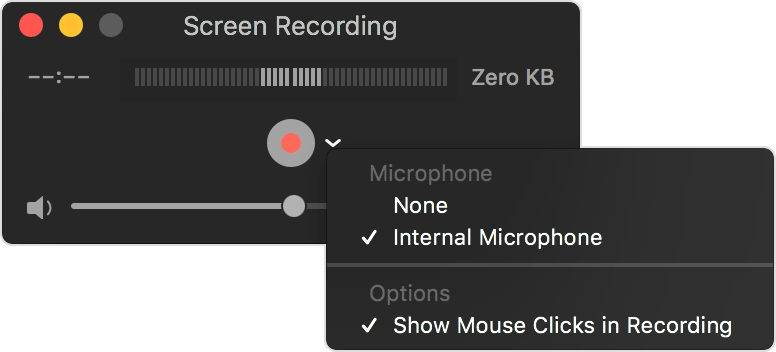
Opening QuickTime Player: Launch QuickTime Player on your Mac from Spotlight or the Applications folder.
Starting a New Screen Recording: In QuickTime Player, go to the top menu, click on “File,” and select “New Screen Recording” from the dropdown menu to open a screen recording window.
Selecting Audio Input: Within the screen recording window, choose your audio input source, such as “Internal Microphone” or an external microphone for voice recording.
Choosing Screen Area: Click on the screen to select the area you want to record, whether the entire screen or a specific portion.
Starting the Recording: Click the “Record” button in the screen recording window to begin capturing your screen activity with audio.
Ending the Recording: Click on the “Stop” button or use the specified keyboard shortcut in QuickTime Player to save the recorded video with audio to your desired location on your Mac.
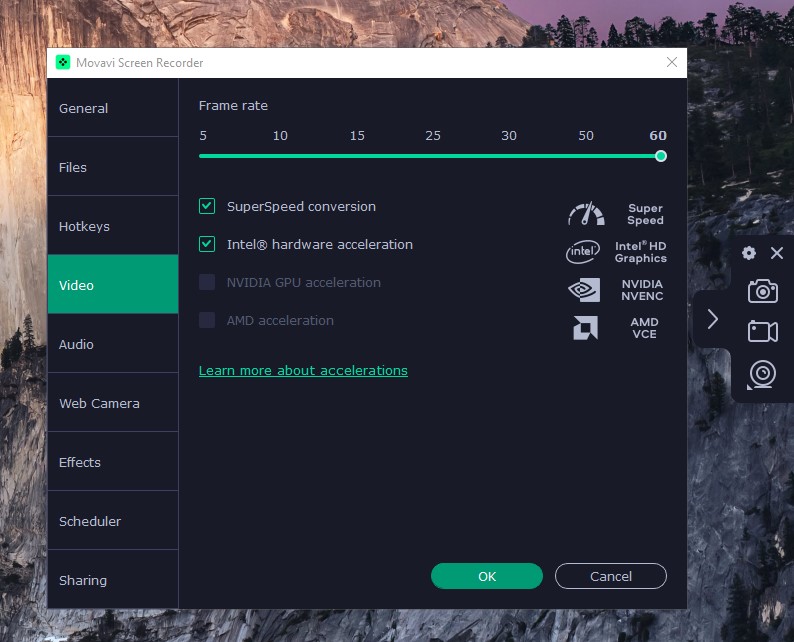
Using Movavi Screen Recorder
For advanced features and customization options, consider using third-party screen recording software like Movavi Screen Recorder. If you want to know how to screen record on iMac with Movavi Screen Recorder look at the steps below:
Download and Install Movavi Screen Recorder: Visit the official Movavi website to download and install the software on your Mac.
Launch Movavi Screen Recorder: Open the application from your Applications folder or dock icon.
Set Up Recording Parameters: Adjust recording settings, including screen area, frame rate, and audio input.
Select Audio Source: Choose your audio input source within Movavi Screen Recorder.
Adjust Recording Settings: Customize video quality, output format, and hotkeys for recording control.
Start Recording: Click the “REC” button to start the screen recording process.
Finish Recording: Click “Stop” within Movavi Screen Recorder to save the recorded video with audio to your specified output folder.
Conclusion
Recording your screen on a Mac with audio is now easier than ever. Choose the method that suits your needs best and start creating your screen recordings today. Whether for personal or professional use, these tools make screen capturing a breeze. Unleash your creativity and give it a try!
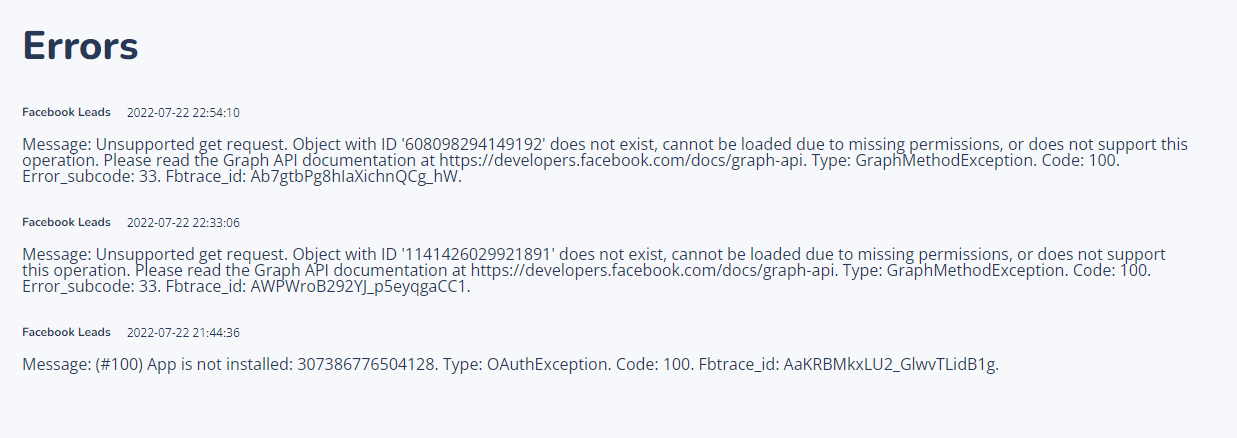
I am trying to figure out a way to take people that apply on indeed and set up for that contact info to recieve an automate email from an email platform to send a calencdy link
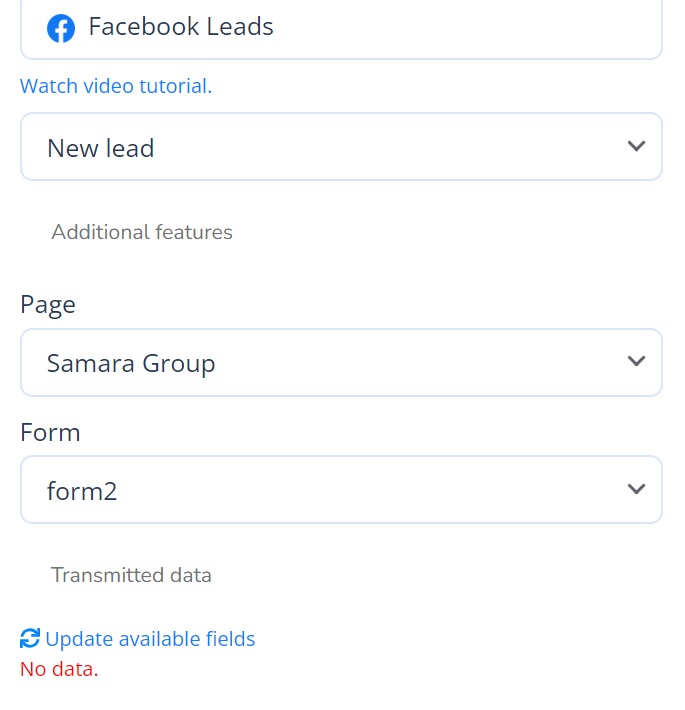
Hi Samara, I found the solution to this problem in this apiway tutorial at minute: 3:19, it tells you the steps to follow to continue. I attach the link to the video: https://apiway.crunch.help/en/facebook-lead-ads-form/facebook-lead-ads-with-google-sheets Greetings.
Amazon has released a detailed announcement with several depreciation deadlines for different cases. This blog piece will further make it more affable for sellers to understand the effect of this announcement. Also, to figure out how they can adapt to it and avoid any discontinuity to their current selling campaign by migrating to the latest SP API.
So without further ado, let’s begin with a few basic questions that must be squirming through your minds.
What is Amazon SP API?
In the words of Amazon, the Selling Partner API is a REST-based API. It further helps Amazon selling partners programmatically access their data on listings, orders, payments, reports, and more.
What Difference will SP-API make?
Compared to the previous API applications, using the Selling Partner API will:
Increase selling efficiency,
Reduce labor requirements,
Improve response time to customers,
Gives more chances for selling partners to grow their businesses.
Why is it important to migrate from Amazon MWS API to the new SP API?
All future development will only be available for the Selling Partner API.
In the coming months, the functionalities will be revoked one by one, and soon the API call process will come to a halt.
How does the MWS API depreciation affect sellers?
There are 2 simple cases for sellers selling on Amazon:
Sellers Using a Third Party Developer account or public developer account for selling on Amazon
Sellers Using their own Amazon Developer Account for selling on Amazon
Now let’s understand both cases in detail
CASE 01: For Seller Using a Third Party Developer Account
For sellers who have not migrated to SP-API and using a third-party seller account will face the following issues:
Post July 31, 2022, sellers will be unable to successfully call Amazon MWS Orders, Reports, and Merchant Fulfillment (MFN) sections in Amazon MWS.
Post September 30, 2022, sellers will be unable to successfully call the MWS Products section
On September 30, 2022, The Selling Partner API for Catalog Items v0 operations will also be deprecated
Post December 31, 2022, sellers will be unable to successfully call any of the remaining sections in Amazon MWS, including:
Feeds API
Finances API
Fulfillment Inbound Shipment API
Fulfillment Inventory API
Fulfillment Outbound Shipment API
Recommendations API
Sellers API
Subscriptions API
Push Notifications Schemas
From July 31, 2023, all sellers must use the new Restricted Data Token (RDT) via the Tokens API to make a successful API call for some operations.
NOTE: The bottom line of the above 5 deadlines is that for sellers using a third-party Amazon seller account and have not migrated to the new SP API will start facing the restrictions from July 2022, and by the end of 2022, the entire process will get to a halt.
What will happen to sellers using 3rd party Integrations like Amazon Magento Integration by CedCommerce?
CedCommerce has launched its new version of Amazon Magento Integration, which is totally compatible with the latest SP API
Sellers need to upgrade the Integration by booking a slot for Migration Session.
Once the slot is booked, one of the members from the Amazon development team will be assigned to you, who will successfully migrate the store.
The customization available in your previous store will be recreated in the new one as well
This Migration is chargeable and will vary based on the number of customization you need to keep in your new store.
Case 02: For Seller Using their own Developer Account
The sellers who have a self-authorized & private application are given a bit of relaxation in terms of strict deadlines for migration.
For sellers who have not migrated to SP-API:
Post July 31, 2023, sellers will be unable to successfully call Amazon MWS Orders, Reports, Merchant Fulfillment (MFN), and Products sections.
Post July 31, 2023, all sellers must use the new Restricted Data Token (RDT) via the Tokens API to make a successful API call for some operations.
Post December 31, 2023, sellers will be unable to call any of the remaining sections in Amazon MWS successfully, including:
Feeds API
Finances API
Fulfillment Inbound Shipment API
Fulfillment Inventory API
Fulfillment Outbound Shipment API
Recommendations API
Sellers API
Subscriptions API
Push Notifications Schemas
NOTE: It is advisable for sellers to directly confirm with Amazon regarding the type of Developer account they are currently using. In case the account is private, sellers need not hurry until the next year (2023). But in the case of a third-party developer account, they are required to take action before the end of July this year (2022) for uninterrupted selling.
hello everyone. ive recently tried to use apiway and for some reason, my entries are going to the lowest thousandth row every new entry. why is this so? and even if i were to add custom formulas in order to remove certain characters from the result, it clears the formula and i could no longer use the formula.
is there any way that i dont have to choose all the elements every time i want to reload the fields?
Hello, I am totally excited about Apiway and would like to bring the zaps from Zapier that I have built for myself to Apiway.
An automation is about activities created in Pipedrive appearing in a list because the date is overdue, thus triggering the automation.
In Apiway, I can only find the item "New Activity" in the trigger action and not "Activity Matching Filter" as in Zapier. Am I missing something or is this named differently in Apiway?
I am looking forward to your support and wish you a nice weekend.
I'm new to Apiway. Been using IFTTT for years but been encountering issues. Need an integration for recurring tasks within Todoist, upon completion want to have a row added into a row in a spreadsheet on Google Sheets. Will Apiway do this?
I have set up a way between Todoist and Google Sheets where the trigger is a task being completed in Todoist. After the trigger event takes place, a new row is supposed to be created in the Google Sheet recording the Project ID, the task name, and the Date of Completion. Both the Project ID and the task name show up correctly, but I obtain an empty field for the Date of Completion. Any ideas for why this is or how to fix it?
We have checked out your issue and did not detect a problem. The date was successfully added. Please, try to delete and create this way again. Also, check the type of the column with dates in your worksheet. Maybe the type of the column does not coincide with the Todoist date format. Or maybe Todoist sends an empty date value.
Billing State not showing the exacte name after the order got transferred to google sheet . for example in the woocommerce orders list its showing "Batna" wish is the name of a state on my country. but in google sheet its showing "DZ-05" wish means the number of that state on my country.
another thing. Line Items Variation not showing also in google sheet. its showing only on the woocommerce platform in orders détails .
Holding webinars and automated webinars is one of the key business processes in educational businesses. There is a lot of information on the Internet about how to hold a live webinar and what to speak about, so in this article, I will tell you how to make an automated webinar.
Attention! This information is for those who have already held live webinars and know how to convert webinar visitors into sales. If you haven't, this article won't help you, but it will only make things worse.
What is the difference between webinars and automated webinars?
A webinar is a live performance in front of the audience.
You broadcast live, show a presentation and answer questions in real-time. An automated webinar is a recording that is turned on at a specific time.
An automated webinar looks like a live webinar. Exactly the same presentation, links to your products and chat in the webinar room.
In good services, you can prepare questions that will appear at a certain time in advance and you'll be able to answer them during the presentation.
You probably think why I should do an automated webinar when I can give a link to YouTube.
The automated webinar starts at a specific time. It cannot be paused or viewed at a convenient time.
Today we need to learn to hold the attention of the client. Watching a two-hour video on YouTube, the user can find something more interesting and close your presentation with the usual excuse "I'll watch this later".
When you hold an automated webinar, the client doesn't know that it's a record. He thinks it's a live webinar and there will be some information that shouldn't be missed.
Why are automated webinars worth to be done?
It's difficult for you to create new unique content constantly. You cannot give new information endlessly, because you'll have nothing to sell.
That's why you repeat one topic, and everyone who comes to your webinar says that you are "saying the same thing" or "saying commonplace things".
Our task is to create several unique automated webinars and guide the client through this content in a logical sequence. For many, it's a chance to pull themselves out of the constant wheel of webinars.
Let me show an example of a problem you will face
You have a specific topic and you decided to hold the first webinar. Of the 500 registered users, 200 came.
You held a webinar and tried to sell your product. 10 people bought. Then you held the second master class, and from viewers who came, there are half of those people who had been on the first one and half the people who saw you for the first time.
You made 10 sales again.
This happens several times and the person who has come to five webinars doesn't receive new information at all. He listens to the same thing, the same subjects from another angle.
He loses interest in you and leaves.
After several years of active work, you accumulate a lot of content on the same topic. The problem is that the profundity of this content is mediocre, because you provide the basic information in paid trainings.
New users don't understand where to start and start to drown in your content.
This problem can be solved with the help of automated webinars.
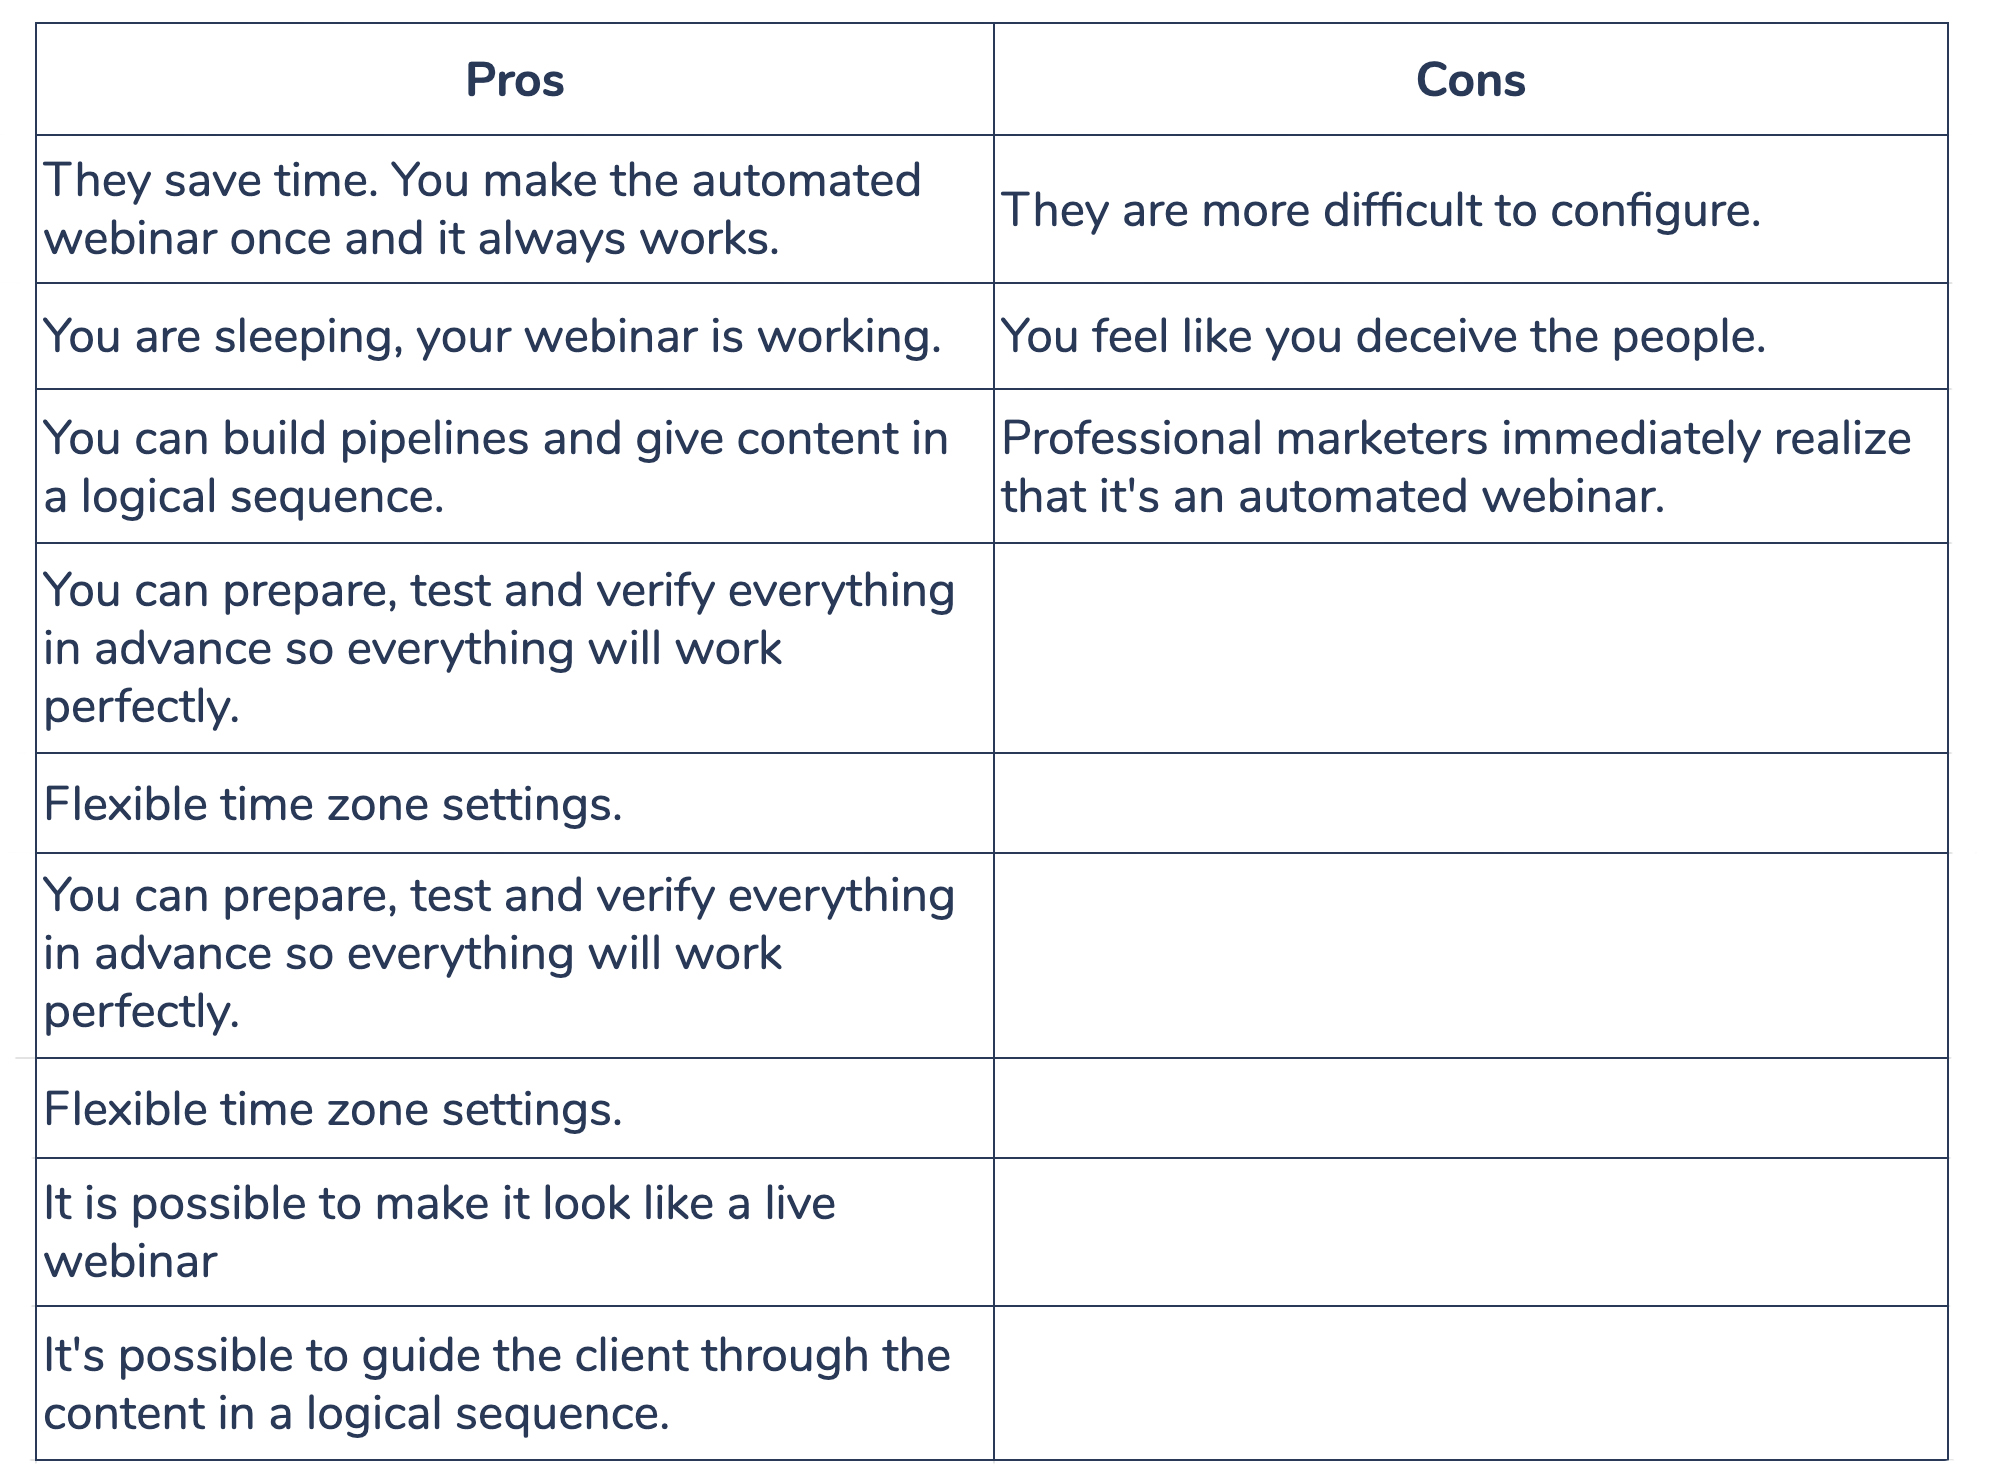
Pros and cons of automated webinars
For what businesses automated webinars are suitable?
Firstly, I want to say that webinars and automated webinars are suitable for almost all types of business and I'll tell you why. But before this, let's discuss a business in which webinars are one of the key business processes.
Educational business
In this type of business, holding the masterclasses directly affects earnings. You constantly need to improve the skills of creating presentations and sales at the webinar. In addition, you need to use an automated marketing system.
Thanks to it, you can focus on improving the content, rather than increasing its amount.
It is better to make an automated webinar on a specific topic once than to make 5 webinars on the same topic, but show it from different angles.
Service business with big average check
When you sell expensive services such as construction, design, law, you need to do 2 things.
The first is to explain to the client why this service is needed and why exactly you are the best to make it. In the case of construction, there's no need to explain why the client needs the house, but in the business of implementing CRM, you need to explain this. There are many builders.
Why should exactly you make this service?
It can be explained through information and content. How you will provide this information isn't important. It can be a personal meeting, a blog article or an automated webinar. The bottom line is that you tell the client how to solve his problem in the best way.
I've seen several cases where the construction company held webinars and told people how they can build a house better. Automated webinars can be made in almost any business.
Automated webinars for SaaS
Automated webinars work very well in businesses for digital products. If your SaaS (Software-as-a-service) product is targeted at small businesses, automated webinars will help you.
In the Enterprise segment, to sell you need to make personal presentations. Long deal cycle and big checks. Even in such a conservative segment, automated webinars will work well, but in the SMB segment, it will be much more effective.
In SMB, you cannot afford individual sellers who will call each customer and sell the product. You simply will not converge unit economics. An automated webinar can replace your sales pitch. Even if you have salespeople, talking to customers who have already watched the presentation is much nicer.
Features of automated webinars platforms
In most cases, automated webinars platforms have all the functions that usual webinar platforms have: screen translation, recording, chat, etc. Let's talk more about the unique features that are in automated webinars platforms.
Making an automated webinar from a live webinar
You have an opportunity to make an automated webinar from the recording of your real webinar. You had a good webinar, you know that it converts visitors to sales, there were a lot of people, they asked questions, you answered them.
This is an ideal situation.
You just take a recording and with one click of a button make an automated webinar. All questions in the chat are also transferred and will appear exactly at the time they were asked. It turns out a complete simulation of a live webinar.
The number of webinar visitors
You can set a dynamic change of visitors to the automated webinar. Even if there is one person watching it, it will seem to him that he's not alone.
At the beginning of the webinar there will be one number of visitors, in the middle it'll be another number, and in the end, it'll be the third. The number changes gradually and the visitor won't notice that it's fake.
Chatbots
In advance, you configure the chat in such a way that fictitious users write messages at a certain point in time.
For instance, you want to overcome the objections through an answer to a question. The bot writes a message at the 48th minute of the automated webinar: "Why is it better than your competitors?" and you answer it.
For a webinar listener, this will sound organically.
Automatic date change
You can set the automatic date change. You don't need to worry that you are launching traffic to the "passed" webinar. You configure the webinar to take place every Tuesday at a specific time. Also, on the landing page, you can create a script that will do automatic date changes.
Time Zone Setting
This feature is important, especially if you sell to an audience from other countries. Now everyone can attend your events, regardless of time zone. The user himself will be able to choose his time zone and when he wants to watch an automated webinar.
Also, the system can automatically determine in which time zone the client is located and substitute the variant he needs.
Price Blocks
When you hold a webinar, at a certain time you give a link to your product.
In an automated webinar, it can be done too. At the right moment, at the right minute, a link to your product will appear.
You can show the price on the banner.
You can change it, and in the webinar recording itself, don't talk about it. Just say the phrase "You see the price on the banner".
Thus, you can do A/B price tests and won't re-record webinars every time in a new way.
Engagement tracking
Webinar platforms can track engagement in a webinar. Who's come? When did he come? How much time he watched the webinar? When did he leave? Did he click on the offer or not? And much more. This data can be transferred to your CRM or marketing automation software.
Tagging
The system can tag each subscriber. Tags can be a trigger for other actions.
For example, for those who came to the webinar, you put the tag "came" and send an email with an offer to buy. For those who didn't come, you put the tag "didn't come" and offer to buy a webinar recording. And for those who came and spent more than an hour, you put the tag "Saw the offer" and send another letter.
To transfer tags, you need to use integration through Apiway.
Series of automated webinars
You can make a special chain of emails that will automatically register people to different automated webinars.
Let's say you have 7 automated webinars and they will be held every day. But the user will receive an email with an invitation to these automated webinars once a week or once every two weeks. He will have the illusion that you constantly hold webinars.
Also, you can track which automated webinar the user has visited and resend invitations to him. Automation can be closed. This process requires a special function. In this video, we use TimeDigital CRM and EverWebinar for such purposes.
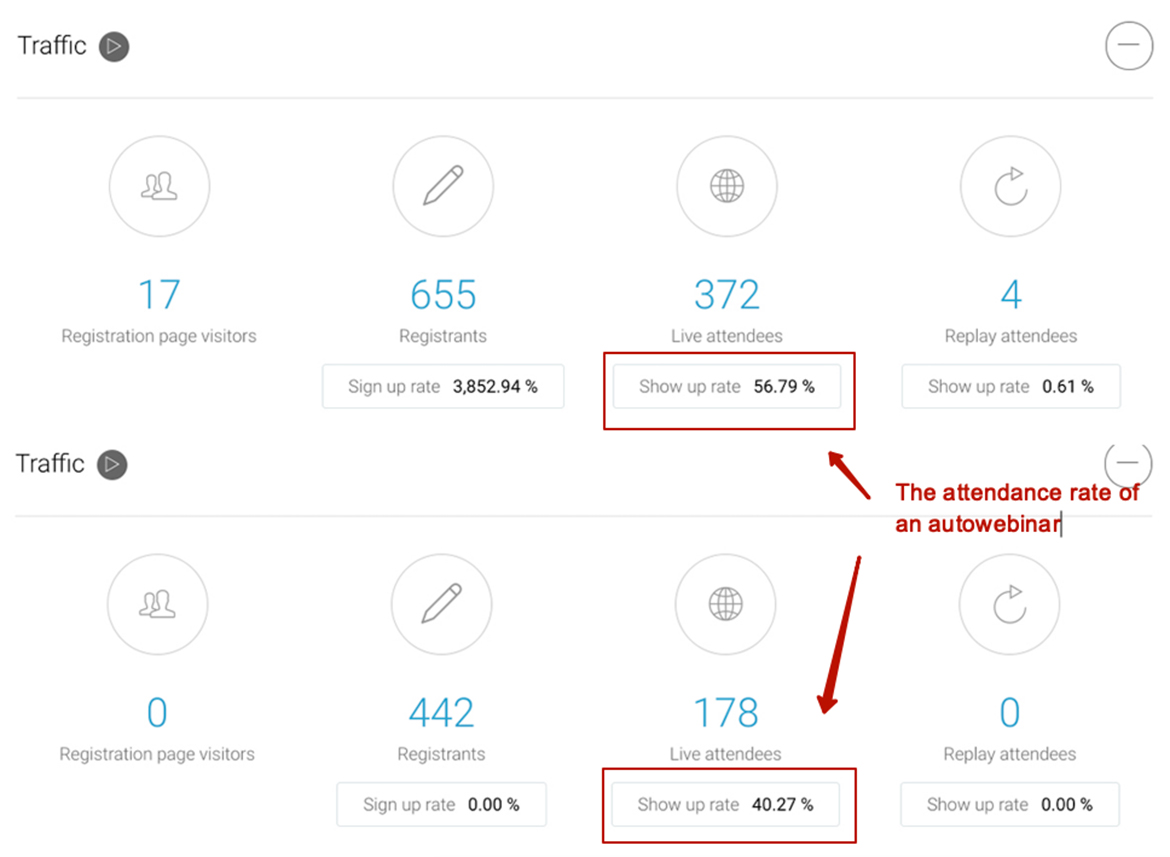
How to increase the attendance rate of an automated webinar
This rate is influenced by many factors: brand awareness, topic relevance and the niche in which you work. The average attendance rate on an automated webinar is approximately 25-35%.
If your percentage of attendance is lower, then you do something wrong. If it's higher, everything is fine. It is also important to understand that in large volumes the rate will fall. Here are some screenshots from our automated webinar.
We've put together a list of recommendations that can improve your attendance.
SMS notification 15 minutes before the start.
SMS notification 1 hour before the start.
Notification in the messenger (Trigger mailing by API).
Dialing 15 minutes before start.
Different landing pages and different automated webinar for each time zone.
Warm traffic from your newsletter, not from paid advertising.
Retargeting for those who registered with a reminder of the webinar. (Advertising starts working through the marketing automation system, not in the advertising office).
Webinars are held every day.
Do A/B testing with the time of the automated webinar.
Make a webinar record paid.
Mistakes in automated webinar launch
You don't need to make an automated webinar as a simple broadcast on YouTube and hire programmers for this task. There is special software for automated webinars, where everything has already been made for you.
The big mistake is to rely only on email notifications or only on Facebook Messenger. It is important to use the combination of Email + SMS and, if necessary, FB Messenger.
Don't wait too long periods between webinars. For example, a user clicked on an advertisement, the topic is interesting, but the webinar will take place in a week.
Automated webinars should be held every day. You can make the webinar the next day and send warming content before it. So, at the webinar, you will have an opportunity to make the deal immediately.
Don't launch an automated webinar without having experience in live webinars. First, understand what you have learned to sell at live webinars, and then do automated ones.
Don't try to do your best for the first time, with prepared bots in the chat of the webinar room, ready answers, etc. You can spend a lot of time making such a webinar, but it doesn't give you a guarantee that it will bring money.
In the beginning, make an automated from a live webinar. Make poorly at the beginning, understand how it works, and only then do well.
Don't drive a lot of traffic for the first time. When you set up an automated webinar, it will work correctly for the fifth time.
In the beginning, you seemed to do everything, everything worked. You made advertising, but SMS didn't come. You did this all again.
Then the link didn't work, then the broadcast didn't launch in time.
It's ok.
You just need to get through it. I remember my friend drove a lot of traffic on his first automated webinar. But the video didn't work. This mistake cost him $ 3000. He did the same 3-4 times and as a result, he spent a lot of money on testing.
Don't repeat his mistakes. Invite 5-10 visitors and when you realize that everything works correctly, scale it.
Live Chat software helps you to have
a conversation with customers
on your website customers on your website software helps you to have
a conversation.